 |
| I apologize for the fact that it looks like a 5 year old has painted them for me, I did actually do it myself... |
 |
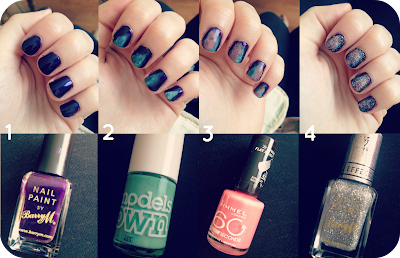
1. Choose a dark colour to paint as the background for this effect and apply one layer.
If you do more than one then it becomes gloopy and will take sooo long to dry, and it's going to have more coats on top so it doesn't matter too much how good it looks!
2. Use a sponge to dab on the first colour. It doesn't have to be neat or look the same on each nail.
3. Wait for this to dry before you use another sponge (or the other side of the same one like I did!) to apply the lighter colour, focussing on the other side of the nail but it looks good if it overlaps a bit too!
4. Paint a glitter polish all over the top for the starry effect!
Easy peasy intergalactic nails!
Thanks for reading :)
Georgia


wow these are great!! i need to try these :D
ReplyDeleteJen xxx
deffo! It's actually quite easy, I'd always wanted to try it but thought it looked to difficult for me and my shaky hand! haha but it went quite well and all the splodges round the edges have come off now! xx
DeleteThese are beauts - I LOVE that Rimmel nailpolish, definitely one of my favourites <3
ReplyDeletehttp://ohmyolivia.blogspot.co.uk/ xo
Thanks! yeah it's so lovely isn't it :)
Deletexx
I love these! Yours look better than mine did haha, but I'm hoping practice makes perfect?! xx
ReplyDeletehttp://hedgehogloves.blogspot.co.uk
Really need to try this out for myself! Thanks!
ReplyDeletehttp://abundanceoferica.blogspot.ca
I <3 it! Looks really cool:)
ReplyDeletexxx
eve